In this section, we'll explain how to set up your traction wing and how it works. For more information on traction wings, you can also consult our buying guide : How do I choose my traction kite ?
The disciplines of powerkite are activities that provide inimitable sensations, and can be practised at a modest level or in the most extreme, aerial conditions. In any case, when you set out on your own mountainboard, whether you're flying a kite, buggy or snowkite, you need to start by learning the basics so you can practice your land traction sport in complete safety. This starts with learning how to set up and connect your traction kite, and how to pilot it on foot. Likewise, you need to learn a few wind-related notions to fully understand how to evolve with a traction kite.
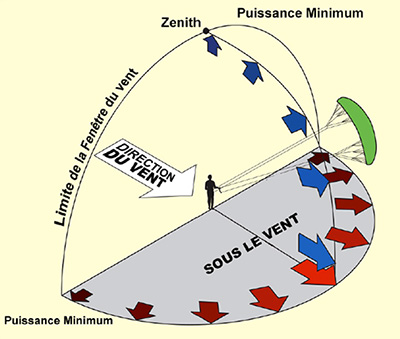
The wind windowBefore launching your wing, it's very important to understand the wind window. The image below explains where your traction glider will produce the most power (full window) and where it will produce the least (window edge and zenith).
Installation of the powerkite Step 1 - Before you start1. Find a suitable place to set up your traction kite.
WARNING: Never use a wing near power lines, railroads or airports. Make sure the area is not occupied by other people or wing users. Never use your traction kite on a crowded beach! Make sure you have at least 100 meters downwind of your glider, free of buildings or other obstacles.
2. Take your traction kite out of its bag and unfold it. The bottom surface should face the sky, with the trailing edge opposite the wind direction. Place sand or any other weight on the trailing edge to prevent it from catching the wind.
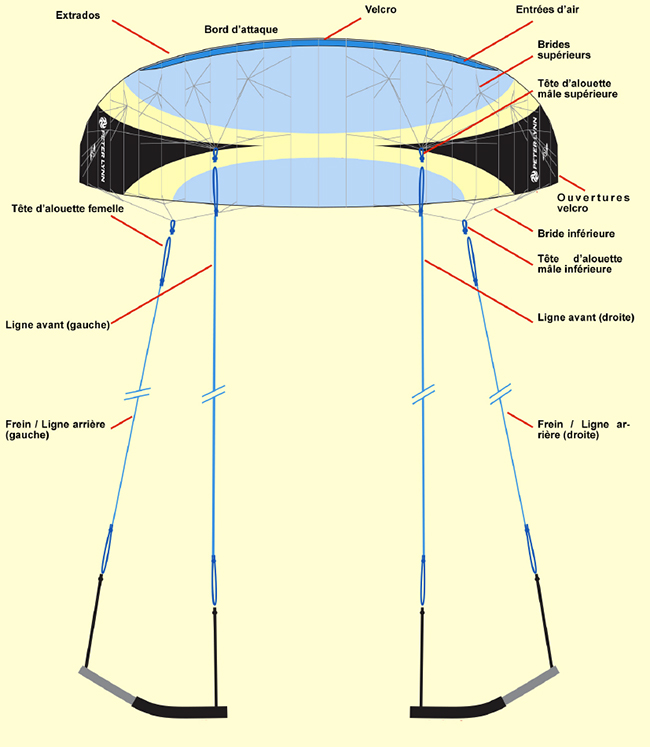
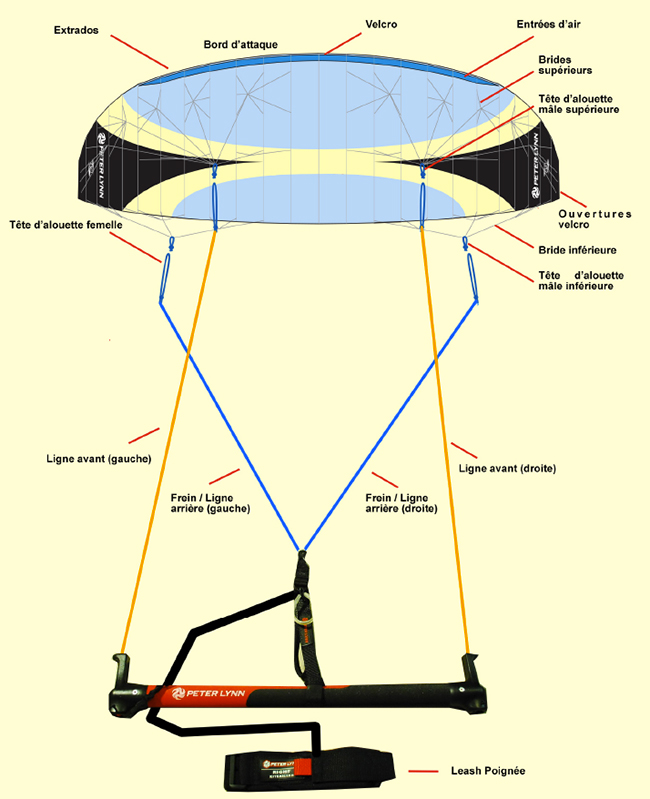
3. The four lark heads are fastened together in the velcro in the middle of the leading edge. Remove the lark heads from the Velcro, make sure the bridles are not knotted, and lay them on the ground.
Step 2 - Unwind your linesStarting from the wing, unwind your lines slowly backwards. Walk in the opposite direction to the wind, which prevents the lines from tangling and makes take-off easier and quicker. Always try to keep the lines straight to avoid tangling. Lines should be parallel to each other. The thickest lines (front lines) should be on the inside, and the thinnest on the outside (back lines).
Step 3 - Attach your linesAttaching lines to handles
Tie the lines to the handles using a lark's head knot, as shown in the drawing below. 1. Make a lark's head on the end of the line.
2. Slide the lark's head over the knot on the handles.
3. Tighten the lark's head and slide it against the knot.
Attaching lines to the wing
Tie the lines to the wing using the same lark's head knot as described above. Slide the female lark's head onto the male lark's head at the end of the bridles.
Now you're ready to fly your traction kite !
| | Diagram of how to set up a wing with 4-line handles
 | | |
| | Diagram of the installation of a wing in 4-line bar
 | | |
Take-off
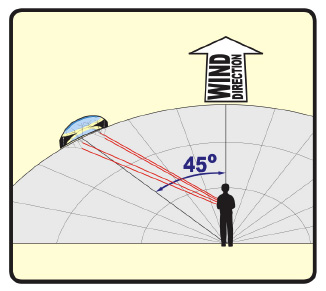
1. Make sure the traction kite is still attached to the ground by putting sand on the trailing edge. Position yourself so that your lines are at about 45 degrees to the wind direction. The more you take off in the wind window, the more power you'll generate.
2. Check again that the area is clear. Slowly take a few steps back. The leading edge will lift and the sand will recede from the trailing edge. You can stop backing up when the traction sail takes off.
3. If the wind is strong enough, the wing will automatically climb towards the zenith.
If you're more experienced, taking off your traction wing directly into the window is also a possibility. Make sure you apply enough tension on the back lines. You need to apply enough tension on the back lines so that the traction kite takes off without gaining too much speed. By gradually releasing the tension on the back lines, the wing will automatically fly towards the zenith without you having to pull too hard.
Take off with someone's helpAs an alternative to step 2, you can also ask someone to hold your traction wing by the leading edge so that it's ready to take off. First, let the wing fill with air, then the helper should launch the wing upwards on your signal. Again, make sure your lines are at 45 degrees to the wind direction.
Fly your own wingFly your own wingOnce the traction kite is in the air, flying it is quite easy. Pull the left handle to turn the kite to the left and vice versa.
Rapid movementTo make your kite more responsive, turn the handle to pull harder on the back line. Just pull the back of the handle.
Looping your wingPull back on a handle and hold this position. The kite will make a full turn, generating plenty of power. The lines will become twisted, but don't worry! Don't swap handles from one hand to the other; the left should always remain on the left and vice versa. Turn your sail in the other direction to get the lines straight again.
Adjusting your traction kiteOn 4-line traction wings, the main adjustment is to adjust the relative length of the rear lines to best suit the conditions and your style.
First, make sure the front and back lines are of equal length, then take off. - If the wing overtakes you at the zenith (in the direction of the wind), the back lines should be shortened. - If the wing doesn't take off, the front lines should be shortened.
Adjusting the front/back lines can be done very simply by adding extra knots to the pre-lines located on the handles. Then simply place the "larks heads" of the lines behind these knots.
LandingTo install your traction wing :
1. First check that the area is clear.
2. Put your wing at the edge of the wind window, right or left, and bring it down to the ground. Pull on the back lines so that the wing lands slowly on the trailing edge. Secure the handles with the Peter Lynn peg if possible, making sure there's always more tension on the back lines. Make sure the wing doesn't move by weighting it down with sand or any other weight.
Sometimes it can be difficult to land the kite, especially in strong winds when the kite tends to take off again. Also make sure that when the traction kite is on the ground, there's no air inside, and that it won't catch on the wind. Find out more about the design of a traction kite bridle.
> Back to menu Powerkite Information Guide
> Back to shop powerkite
| 


